DNS leaks and how to avoid them
A DNS leak occurs when DNS (Domain Name System) requests go outside your encrypted tunnel. This allows your ISP or other parties on the path to see the domains you look up, even if your traffic itself is proxied or VPN-encrypted.
In this guide, “no DNS leak” means your DNS queries do not leave directly via your ISP link. They should traverse your tunnel (e.g., to your VPS) or another path you control.
Am I leaking?
Use any of these test services:
How to read the results
- Ignore the final “protected/not protected” labels. Many services flag “not protected” if you aren’t using their resolver.
- Focus on the list of DNS server IPs and their locations.
- If the listed DNS servers are in your VPS location (or the resolver you chose) and you do not see your ISP’s DNS routed through your home country, you are not leaking to the ISP.
Solution: add a separate DNS inbound that explicitly dials a resolver and sends it via your outbound tunnel.
How a leak happens and how to close it
The chart below shows a DNS query's path before and after setting up a dedicated DNS inbound.
The red branches are leak scenarios: queries exit via the ISP link. The green branch is the correct path: the DNS inbound intercepts queries, the routing rule steers them to the proxy outbound, and they reach the public resolver from the VPS side. QUIC blocking isn't strictly a DNS concern — it closes a parallel channel the browser could otherwise use to reveal your real IP around the proxy.
How to configure XRAYUI
Important
This manual is only applicable to the XRAYUI v0.58.0 and above. You can check your version by executing the command xrayui version.
Your main inbound (e.g., dokodemo-door with Follow redirect = ON) is for transparent interception (TPROXY). It forwards to the original destination. When the router’s DNS forwarder (dnsmasq) talks to 127.0.0.1, there is no “original destination,” which can cause loops and cannot reliably forward DNS upstream.
Create a dedicated DNS inbound
Add a new DOKODEMO inbound:
- Port: choose a local port for DNS inbound (e.g., 55100)
- Follow redirect: OFF
- Destination address: a public resolver you trust (e.g., 8.8.8.8, 1.1.1.1, AdGuard) or your own DNS on the VPS
- Destination port: 53
- Network: udp,tcp
- Save.

Note
Notice the checkbox Follow redirect is unchecked. This is important setting to make DNS not to leak. Dont't turn it on for this inbound configuration.
Configure transport (tproxy) and dialer
Open Transport for this DNS inbound → Transparent Proxy (tproxy) → Manage:
- Enable tproxy for this inbound (select
tproxy). - Close this window and
applyconfiguration changes in the main form.
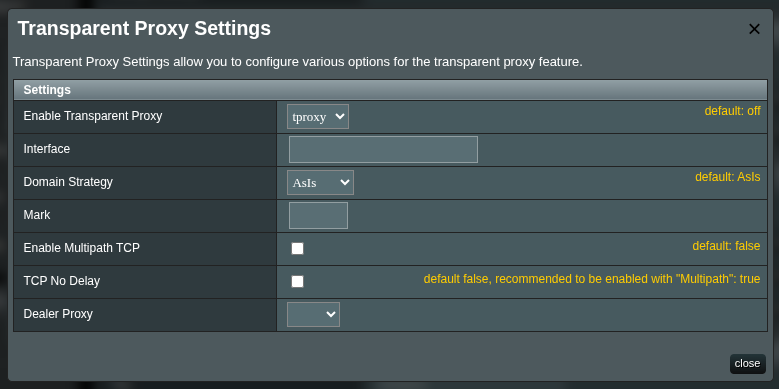
This pins the DNS outbound path to your tunnel, independent of routing rules.
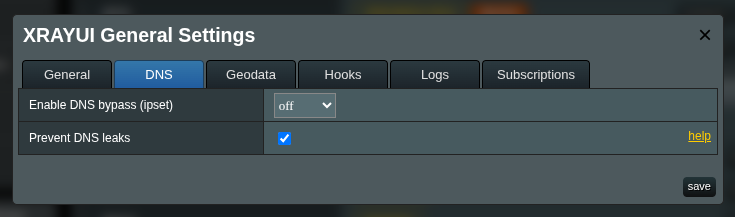
Enable “Prevent DNS leaks”
Go to General Settings → DNS and turn on Prevent DNS leaks.
When enabled, XRAYUI does two things:
- dnsmasq lockdown —
no-resolvis appended andservers-file=(the WAN-provided resolvers) is commented out. dnsmasq forwards queries only to the dedicated Xray DNS inbound. - Firewall safety net — a
XRAYUI_DNS_LOCKchain is hooked intofilter:OUTPUTandfilter:FORWARD, dropping every UDP/TCP packet destined to port 53. The DNS inbound listens on a non-53 port (e.g. 55100) so it is unaffected; legitimate DNS leaving the router does so as the proxy protocol (e.g. TCP/443), not UDP/53. This catches:- dnsmasq misconfigurations or other router-local processes that try to query upstream directly.
- LAN clients that hardcode
8.8.8.8/1.1.1.1and slip past TPROXY.
Important
The toggle is guarded: XRAYUI refuses to enable it unless a dedicated DNS inbound (dokodemo-door, destination port 53, follow redirect off) is present in the configuration. Set up the inbound first (steps above), then turn the switch on. If you somehow end up with the toggle on and no DNS inbound (e.g. after editing the config by hand), the firewall lock is skipped — a warning is logged — so you don't lose all DNS resolution. Fix the inbound and re-apply.
Troubleshooting
- Name resolution stops working after enabling the switch — check that the dedicated DNS inbound is actually listening (
netstat -lun | grep <port>) and that its routing rule sends thednsinbound through the proxy outbound. Disable the switch, fix the configuration, and re-enable. - A specific device still leaks — the firewall lock blocks UDP/TCP 53 only. Devices using DoH (HTTPS, port 443) or DoT (TCP 853) bypass the lock. Block QUIC closes the UDP/443 path; for TCP/443 DoH you currently need to block specific resolver IPs at the firewall or via routing rules.
- Router itself can't resolve names — dnsmasq must forward to the inbound. Check
/etc/dnsmasq.conffor theserver=<ip>#<port>line generated by XRAYUI; if missing, the inbound discovery jq filter didn't match (verify the inbound'ssettings.portis53).
Block QUIC
QUIC is a protocol that uses UDP port 443. In some cases, QUIC traffic may bypass the transparent proxy, which can cause your real IP address to leak — especially over IPv6.
Go to General Settings → DNS and enable Block QUIC. This will reject all QUIC (UDP 443) traffic at the firewall level, forcing your browser and apps to fall back to regular TCP HTTPS, which is properly proxied through Xray.
Note
Blocking QUIC does not break websites. All modern browsers seamlessly fall back to HTTPS over TCP when QUIC is unavailable. You may notice a small initial delay on the first connection to some sites.
Testing
For testing, create an additional rule that proxies traffic through your outbound and list the test services in it (for example, browserleaks.com).
browserleaks.com
browserleaks.org
browserleaks.net
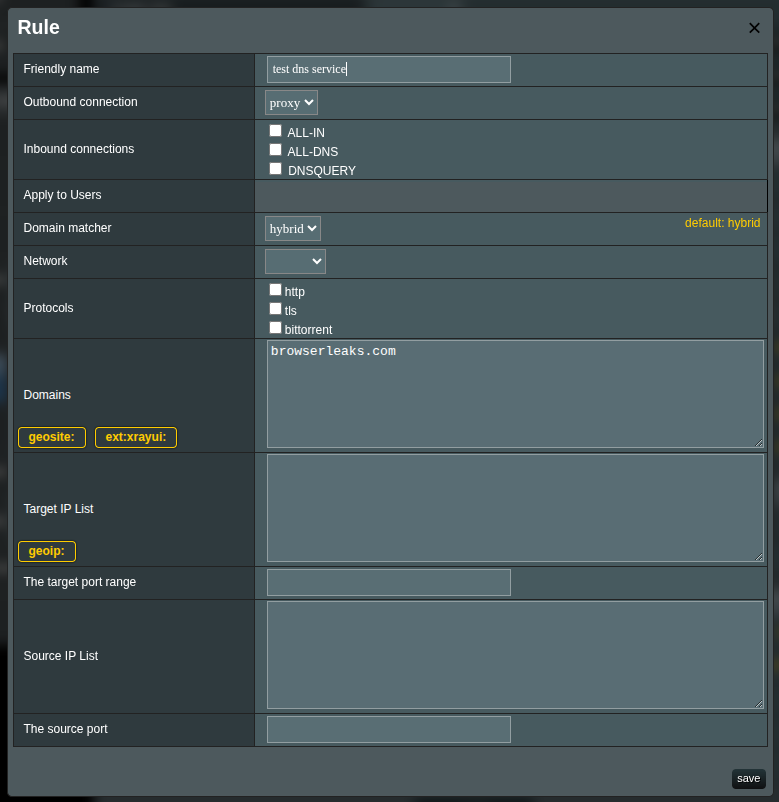
Open browserleaks.com and verify that all reported sources come from your VPS.